New article
Recently updated
Report Designer Example: Using Bookmarks to Quickly View Audit Information

Audit reports can often be very long and manually scrolling between various sections of the report to find the desired information is a laborious task. The findings of audit's often have to be explained in presentation or meeting situations and using bookmarks is a slick way of moving between report sections.
In this example we will create 5 bookmarks in an audit report that we can use to quickly move between the sections of our report. The steps below outline how to add a bookmark and then use those bookmarks to navigate between sections of the report in the Print Preview window. See the related articles for more detailed steps in bookmark creation.
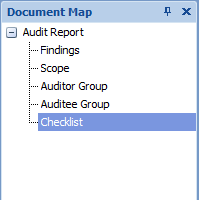
Bookmarks can be created for any item of in the report (labels, text boxes etc..), in this example however we want to move between sections of the report so we are going to add the bookmarks in the group headers for Findings, Scope, Auditor Group, Auditee Group and Checklist.
Creating the Bookmarks
- Open your chosen report in Design Mode of Report Designer.
- Select the section header to add the bookmark to, in this example the first one is Findings.
- With the section header selected go the the Properties Grid and select Bookmark under Navigation.
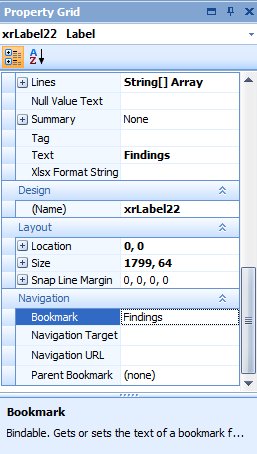
- Enter the name for the bookmark.
- Repeat for the other sections - our bookmark names are Findings, Scope, Auditor Group, Auditee Group and Checklist.
Navigating using our Bookmarks
- Open the audit module and select the audit that you wish to create the report for.
- Click [File], then select [Print Preview].
- In the Print Preview window the Document Map will show the list of all the bookmarks we created.
- Clicking on any of the bookmarks will instantly navigate to the section of the document to which it relates.